Advanced Linux Shell Scripting for DevOps Engineers with User management.

Push yourself because no one else is going to do it for you!
So today, we are going to push ourselves into learning advanced Linux shell scripting.
On how to create a .sh file and execute .sh refer to my earlier blog: Linux Shell Scripting.
Task 1: To create 90 directories in one go.
Are you manually going to create 90 directories, then you will not have time to play.
All work and no play, don't go well.
All 90 directories within seconds using a simple command.
mkdir day{1..90}
That's easy peasy!
Let's make it a little different, create a shell script it creates 24 directories as Movie20 Movie21 Movie23 ...Movie24
As mentioned in the previous blog, I've created a loop.sh file using vi editor.
I have used a for loop here for iteration of numbers from 1-24 for the number of files to be created.

so, when i = 1, we make the directory Movie 1 then it continuously does that till it reaches 24.
Make sure the file has execute permission.
To run the file, execute the below command.
./loop.sh
Voila and we have the Movie folder created, use ls command to view.

Backups are an important part of DevOps Engineers day to day activities.
So, we will create a script to backup our work (file/folder)
root@ip# ls
1 backup.sh backupfolder bin boot dev etc file home lib lib32 lib64 libx32 lost+found media mnt opt proc root run sbin snap srv sys tmp usr var
In the above, we have created backupfolder where we want our contents to be stored after backup, backup.sh is the file in which we will write our script. Refer to the below script. f1, f2 are the locations of the file which we want to backup.
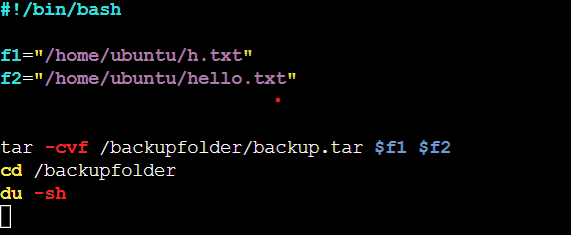
Syntax:
tar -cvf /{destination path}/filename.tar $variable $variable
Flag -c is a mandatory flag used to specify creation of tar file
Flag -v is an optional flag used to print Verbose of the tar file creation, i.e., it prints all the file compression progress to the Shell Command line.
Flag -f is a mandatory flag used to access all the files in the specified path.
Absolute path means the path relative to root folder /
filename.tar is the name of the file to be created after compression with a extension .tar
/backupfolder/filename.tar specifies that the filename.tar is created and moved to /back
root@ip:/# ./backup.sh -> Execute the script
Output:
root@ip-/# ./backup.sh tar: Removing leading `/' from member names /home/ubuntu/h.txt tar: Removing leading `/' from hard link targets /home/ubuntu/hello.txt
32K . -> backed up file size.
root@ip-:/backupfolder# tar -xvzf backup.tar.gz -> Extract the tar file and it lists our backed up files.
home/ubuntu/h.txt
home/ubuntu/hello.txt
Scheduling Shell Scripts using Crontab Scheduler
Crontab Scheduler is inbuilt tool in Linux that automatically executes defined task at specified schedule.
Here, Crontab Scheduler is used to automatically take backup of specified folder using backup.sh shell script every day at 16 hrs.
Open Crontab for root user using the following command:
# crontab -e
Crontab scheduler gives three ways to modify itself. Choose any one.
The Crontab file opens up.
Go at last of the Crontab and specify the command to be executed in following syntax:
Syntax:
0 16 * * * ./backup.sh
The crontab executes the backup.sh file every day of the year at 4:00 pm
Syntax:
(Minute) (Hour) (Date) (Month) (Day of Week) (Command)
Minute: Minute at which the command is to be executed. It takes value from 0 to 59.
Hour: Hour at which the command is to be executed. It takes value from 0 to 23.
Date: Date of the month (1-31)
Month: Month of the year (1-12)
Day of the Week: It takes value from 0 to 6.
0 : Sunday
1 : Monday etc.
Now, that have done 2 scripts, let's go to few basics about User management and creating users in Linux.
User management is the process of creating, modifying, and deleting user accounts on a computer system or network. It involves tasks such as setting passwords, permissions, and privileges for users, and is typically done using special tools provided by the operating system. User management is an important aspect of system administration, as it allows you to control who has access to the system and what actions they are allowed to perform.
Task: Creating 2 users and dispalying their usernames.
Create users with the help of below command: singh and Rock are two users created
root@ip-:/# useradd -m singhroot@ip-/# useradd -m Rock
To check if users have been created or not view the /etc/passwd file
The output will show both users at the end.
singh:x:1002:1002::/home/singh:/bin/sh
Rock:x:1003:1003::/home/Rock:/bin/sh
That's it for today, can't put more emphasis on practicing it hands-on.
Do, like and share. Share your feedback in the comments section.
Any, doubts please reach out to me on LinkedIn. Will be glad to assist!


